Phase 3 control study¶
Reproduce: python studies/phase3_control.py (--quick for a fast run). Numbers come from that
script; raw output in phase3-results.json, figure in figures/.
Scope. This exercises the control-plane mechanics on synthetic B_net trajectories — it is not
a claim about real deployments. It shows the breaker does not thrash, the state machine recovers or
escalates as designed, and calibration hits a target false-halt rate.
1. Hysteresis prevents thrashing¶
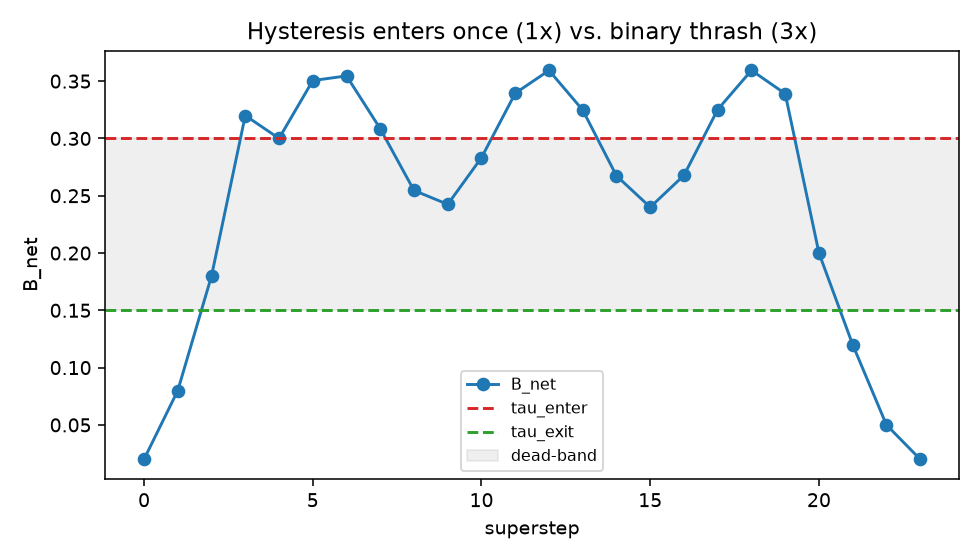
A B_net trajectory that rises past tau_enter = 0.30 and then oscillates inside the
[tau_exit = 0.15, tau_enter] dead-band before decaying, fed to two controllers:
| Controller | Times it enters Intervention |
|---|---|
| Hysteresis (two-threshold) | 1 |
| Naive binary threshold | 3 |
The binary controller flips into Intervention every time the signal wobbles back above 0.30; the
hysteresis controller enters once and stays until the signal falls below the lower tau_exit,
then leaves cleanly. That single-entry vs. repeated-flip difference is the whole reason M3 uses a
dead-band rather than one threshold — a breaker that toggles every step is worse than no breaker.
2. The lifecycle recovers or escalates¶
The state machine on two trajectories (cooldown_steps=1, max_retries=2):
- A spike that clears —
normal → intervention → recovery → normal. OnceB_netfalls belowtau_exitand the cool-down elapses, the run re-enters Normal. - A persistent spike —
normal → intervention → recovery → intervention → recovery → escalated. When repair never bringsB_netdown, the machine retries up tomax_retriesand then escalates to a terminal state for human review, instead of looping forever.
Both paths are deterministic functions of the fed B_net and the machine's counters.
3. Calibration hits a target false-halt rate¶
There is no magic tau. Calibrating on unbiased control B_net (uniform noise) at a target
false-halt rate of 0.02:
| Value | |
|---|---|
| target false-halt rate | 0.020 |
chosen tau_enter |
0.979 |
chosen tau_exit |
0.685 |
| achieved false-halt rate (held-out) | 0.0209 |
The chosen tau_enter produces a false-halt rate on held-out control within noise of the target.
Because B_net's absolute scale is deployment-dependent (Phase 2 study §2),
this calibration path — not a shipped constant — is how a deployment sets its thresholds.
Takeaways for M4¶
- The breaker is safe to wire into a live loop: it enters once, recovers when the signal clears, and escalates rather than looping when it does not.
- The
intervention_hookis where M4's skeptic/MADERA repair plugs in; recovery already re-measuresB_net, so a real repair that lowers bias will drive the machine back to Normal. route_interventiondecides which repair to run (broad → skeptics, concentrated → MADERA); M4 supplies the implementations behind that seam.